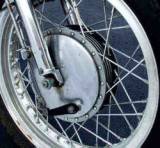
 1972 Harley Davidson Mechanical Drum Brake
You hear a ton of talk about power and torque but once you've upped the ante to boost the forward moving energy of your motorcycle, it's time to start thinking about coming to a stop. The stock 'grippers' on your machine are designed to pass minimum standards set by the Department of Transportation (DOT) based on the STOCK horsepower of your bike. The key words are 'stock' and 'minimum'; that's not normally what you're looking for when you hit the brakes in an emergency. When you've boosted the power of your drive train, you have gone beyond what most OEM brakes are designed and certified to handle. Performance is what we're talking about, and most of us don't want 'minimum' performance brakes; but that's what you've got on your stock machine if you don't upgrade. At the same time there seems to be some confusion regarding the nuances of motorcycle brake systems and how to get more stopping power. Let's try to stop the insanity, halt the misinformation and put an end to the mystification of understanding your motorcycle braking system.
Drums or rotors, pistons, calipers, floaters, sintered, metallic or semi metallic, organic, hoses or cables, DOT 5 or Dot 3, juice or mechanical, compression or flare fitting all refer to the vernacular of brakes. It really isn't all that hard to understand why it can get a little bewildering talking to your mechanic about your brakes when all you want is the piece of mind that they will work when you need them.
Basically, a brake system when properly designed will convert the kinetic energy (created by your drive train) that's moving you forward, into heat energy via friction with controlled surfaces, usually your brake rotors, bringing you to a manageable stop. This is obviously much better than the other option of an uncontrolled conversion of your drive train's energy hurling you into a guardrail, elk, dog, farm animal or even worse yet, the back-end of the car in front of you. So when you throw your leg over your machine it's vitally important to understand brake basics. The correct brake system will allow you to be in control of when and how you dismount your bike at the end of the day.
How efficiently the kinetic energy of motion is converted to safely bring you to a stop depends upon the braking system chosen for your motorcycle application. The two main choices are Disc or Drum systems, which are either activated manually or hydraulically (more about that later).
Most Harleys made since 1973 have disc brakes. Before the engineering gurus at the motor factory decided to step up to the plate with a little 'new-school' technology, they used drum brakes. The basic concept of drum brakes operation involves a round 'drum' shaped shell with two semi-circular 'shoes' with friction material inside the drum. These two shoes were pushed outward by a hydraulic piston or mechanical lever to create the friction that stops the bike.
Think about this for a minute: two arched pads pushing outwards into a spinning metal circle. Sounds like a logical solution to stopping and it beats the heck out of dragging your boots on the ground to stop your forward inertia. The only drawback is that the drums tend to trap water, which will reduce the coefficient of drag that will make your drum brakes 'fade' in wet conditions. A drum also retains a bunch of heat, which also reduces the performance of the brakes when used repeatedly. As modern motorcycles became more powerful and heavier the whole idea of drum brakes didn't seem that great.
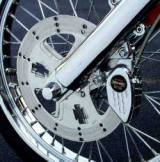
 Harley Davidson Single Piston Caliper
The disc brake system has several advantages over a drum for several reasons. First, the disc runs parallel with the wheel movement so no water can be trapped like a drum brake. Second, the disc may have holes or designs cut into the friction area to dissipate heat faster than a drum, which in turn leads to better performance. Finally, the disc system utilizes a caliper, which squeezes the brake pads with a clamping action. Think of a caliper as a bench vise. It grabs the rotor in a much more efficient squeezing manner, rather than pushing outward which is the method the old-school drum system relied upon to function.
I'm sold on the whole disc brake idea. Now what do I do to make my disc brakes work better?
There are a couple of different disc brake caliper systems employed on a motorcycle. Harleys produced from '73 to 1999 had a 'floating' caliper which used only one piston floating on pins that squeezed the rotor. So the force from you squeezing the master cylinder lever was exerted and cut in half by one piston pushing on two different brake pads on each side of the rotor. This was probably a cost effective way to increase the braking power on your Harley because it had less parts than a caliper with multiple pistons pushing on pads on both sides of the rotor.
In the late 80's, along with the re-birth of the popularity of the Harley-Davidson brand, the aftermarket developed performance-braking soulutions to improve on OEM factory designs. A multi-piston caliper works more efficiently and transfers a larger area of friction to the rotor because pressure is exerted equally on both sides of the rotor by a series of individual pistons working together. There's a lot of science and engineering required to formulate the most efficient ratios between the fluid moved by your master cylinder to the number and size of pistons in the brake caliper. Virtually dozens of companies sell multi piston disc brake calipers for performance applications. Some work great and some do not work any better than the stock floating calipers. Harley finally developed their version and put multi-piston calipers on their machines in 2000.
So how do you know who makes a good performance brake caliper?
This is where the old joke, "I'm from the government, I'm here to help you", stops being funny. The Department of Transportation (DOT) has implemented testing procedures. They are very tough standards to comply with. When you see braking systems on DOT Certified Alternative American heavyweight motorcycles that have more horsepower and torque than your stock H-D, you can be assured that the brake system will perform. A good way to identify these brands is by looking in the Kelly Blue Book; if they're in the book they better have a DOT certificate in their possession. The testing is very intense and is scientifically performed to measure fading, heat retention and durability during a rigorous regiment of on-the-road testing.
 Surgical Steed Stationary 4 Piston Caliper
Let's get down to the fluid, brake fluid that is. DOT 3 was a common brake level grade used that is commonly used in automobiles. DOT 3 brake fluid is very corrosive and will melt the paint right off your motorcycle and burn your skin if you are not careful. Most bikes built after '73 use DOT 5 brake fluid. DOT 5 is a silicone-based fluid and is not as corrosive to paint or your flesh. The only downside to DOT 5 is that it is not found at every corner auto parts store. YOU CANNOT MIX DOT 3 and DOT 5 brake fluid. Even if you are in a bind, don't do it. They react like oil and water which do not mix and will destroy the rubber and seals in your master cylinder, hoses and calipers which will result in no brakes when you need them. Use DOT 5 or nothing at all. If you're going on a long trip, take along a little bottle of it for emergencies. An 8-ounce container doesn't take up much space in your saddlebag or tool kit and can literally be a lifesaver in a bind.
Brake pads come in several combinations of materials that work in conjunction with the material that your brake rotor is made of. A rule of thumb is that if you spend 20% more for a quality brake pad, it will out-last and out-perform a cheap pad by 100%.
Finally, the most important component in your braking system is YOU. Take time to enroll in a rider safety class. It's a ton of fun to throw a borrowed bike into a skid and learn how to handle your way out of an emergency situation. Learning to ride where you have the skills to trust that 80% of your stopping power is in your front brakes is all good. I can't count the number of bikes that come in for service at Steeds with the rear brake pads shot and the front pads are barely worn. It should be just the opposite if you understand the proper way to operate your brake system. T.E.A.M. Arizona (480) 998-9888, www.motorcycletraining.com offers a great course that will give you the skills to ride safely. There is nothing worse than a "short between the seat and the handlebars" to make for a bad riding day. Sign up today; they offer advanced-riding training too.
Keep the rubber side down.
- John at Steeds
